Of all the gift wrapping I’ve done over the years, this is the first time there was really no “wrapping” involved.
I had a pretty elaborate theme planned for this year, but then I came down with the flu. It wasn’t a bad flu, but it lingered and it put me behind on everything. So I shelved that plan until next Christmas and came up with a theme that was less time intensive—animal prints!
The process is pretty straightforward—no special artistic skills necessary. You just need to be comfortable with a utility or X-Acto knife.
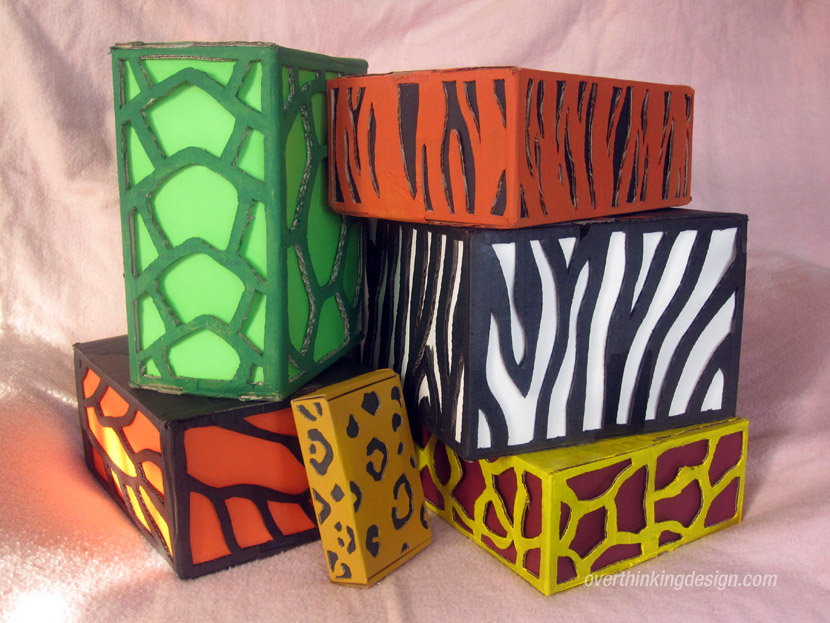
I first came up with my six animal patterns. Go with animals that have bold, easily-recognized markings. I also tried to have a good amount of variety. For example, I could have done a cow and a zebra, but they’re both black and white, so the cow got the axe. The creature list I went with was as follows:
- Zebra
- Butterfly
- Tiger
- Giraffe
- Turtle
- Leopard
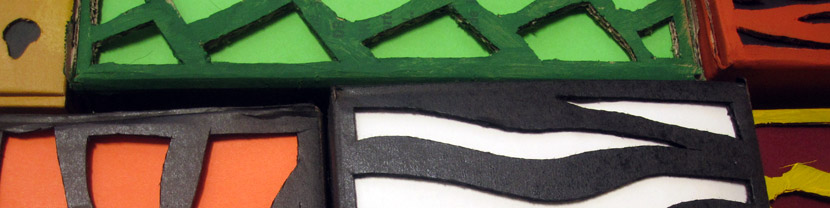
I tracked down cardboard boxes for each gift and using Google Images as I guide, I drew my patterns onto the sides of each box. You can choose the extent to which you want to implement the patterns. I had very little time, so I applied the pattern to just two sides. You can do all four. You can even do top and bottom, although due to the flaps, I suggest you cut off the flaps, cut a separate piece of cardboard the size of the opening, and tape it in place. Or you can simply cut off one set of the flaps and tape the ends of the remaining flap together. If you choose to do the latter, you’ll also want to tape the sides down to create extra support.
It’s then time to start cutting. I began by using a basic utility knife, but the blade was too bulky. The narrow blade of an X-Acto knife ended up working much better for me, allowing for tight turns and easier maneuvering.

Cardboard is a bit challenging, and will tear when you’re dealing with too thin of a section. So keep your pattern large and bold with plenty of space between elements. And keep in mind that the more pieces you cut away, the less strength your box will have. So when you start cutting a side, start in the middle while there’s still plenty of strength left in the cardboard. As you work your way to the sides, the edge bends and corners will supply you with the necessary strength to support your slicing.
When the cutting is complete, it’s time to paint your box. Spray paint is definitely the way to go here. It’s fast and gives you a nice finish. But if, like me, you don’t have many colors of spray paint and don’t want to buy more, acrylic paint will work just fine. Regardless, I recommend removing any labels before painting. Painting over white labels can require quite a few layers. You’re going to have a hard enough time painting over the black lettering that’s usually printed on boxes.
The final step is to line the inside of your box with colored paper that will show through the holes you cut out of the box. If your box is large, covering a panel with a single large sheet of paper may not work well as the middle will pull away from the box, creating a gap and shadows. I suggest either cutting smaller panels that you can tape into place, or cutting strategically-placed holes into the paper that you can put tape over in order to adhere the middle of the paper to a section of the cardboard. That’s it! Add your gift to the box and seal it up.
This was an easy and fun way to prepare this year’s Christmas gifts for my nephews and nieces. I intentionally didn’t put their names on the gifts this year as they got to enjoy sitting around the boxes trying to guess both what the animals were, and who got what animal.
Don’t get too intricate. Keep it bold and keep it bright. And keep Christmas merry by being careful with that knife!
Be sure to check out my Christmas gift wrapping from other years.