With Christmas quickly approaching, I’ve started my annual tradition of gift making. Making gifts can be a challenge. I don’t want to simply give that family member or friend a craft—I want it to be meaningful to them. I want it to touch an aspect of their life.
While I’m not ready to reveal what I’m working on at the moment, I thought I’d share a creation from last Christmas. If you’ve spent any time on Pinterest, you know that recycled material creations are all the rage these days. And while it’s the “green” thing to do, it’s also just plain fun to see what you can do with something that’s destined for the dump.
This gift idea was not difficult to come up with. It was for my sister and she flat out told me what she wanted. She had seen the pallet desk I made for my wife, and wanted a large letter “S” created in the same style to hang on her wall. So with a concept in hand, the most difficult part of the process was complete.
Let’s start by looking at the finished product:
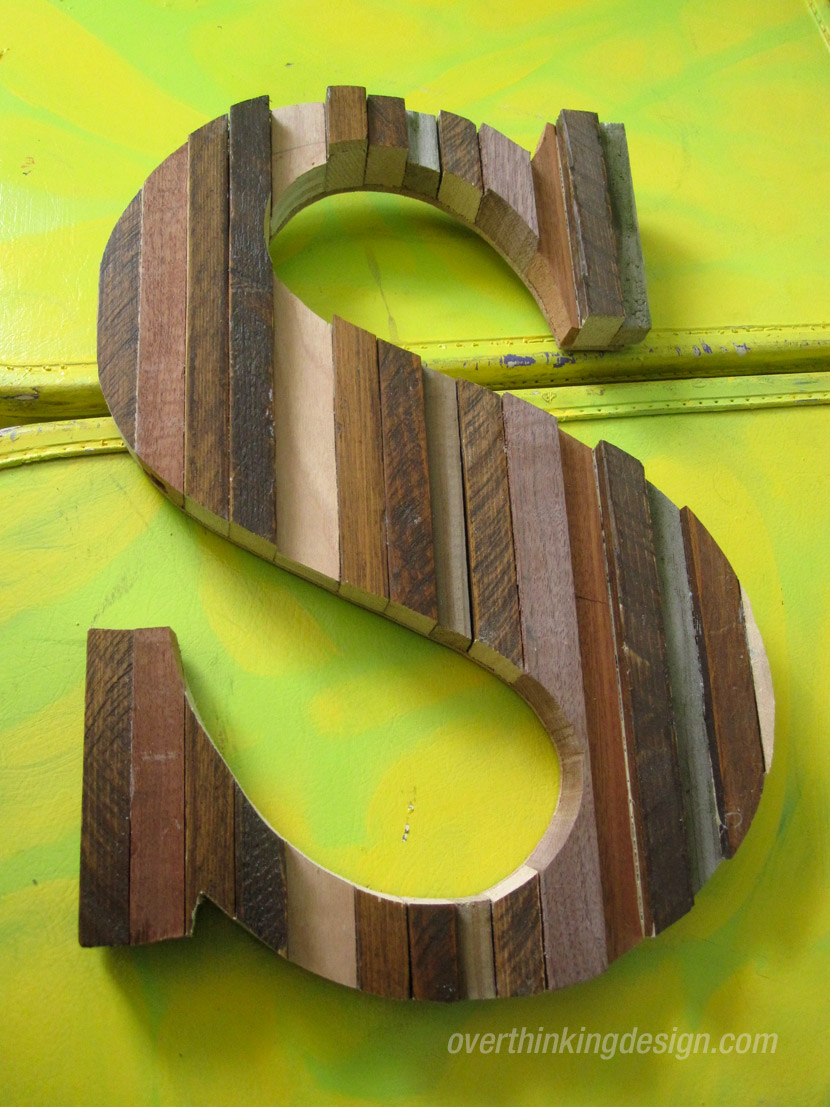
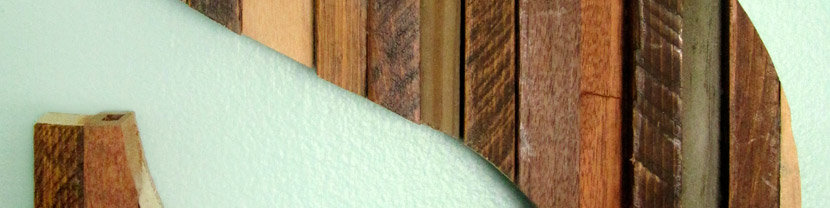
One of the first things you’ll notice is that my wood strips have varying depths. You can certainly cut all the pieces to equal depths—that gives you the option of sanding the completed piece down and making everything smooth and finished. I found the three-dimensional nature of the staggered pieces to be more interesting. Plus I didn’t want to sand away the weathered ends of the scraps, as they give the piece so much personality.
Be aware that the letter you choose to create will define how difficult the project will be. Letters with long, thin angles may have structural issues to address. But remember—even if you’re doing a difficult letter, you have thousands of font styles available to you. Choose one that looks great and will not cause headaches.
The steps are simple.
- Trace the shape onto a thin piece of wood and cut it out. This will act as a guide and will also be your backing for the letter.
- Lay out your scrap atop the letter. Order them in a “planned haphazard” way—intermingle light and dark, rough and smooth, high-profile and low-profile. I oriented my pieces vertically and that’s what I’d recommend, especially if your letter is taller than it is wide. But this is your piece. You can even run the scraps diagonally if you so desire.
- Glue the pieces together making sure to clamp them tightly. Before gluing, be sure the back ends are all flat against the template, and the pieces are covering the entire surface area of the template.
- Trace the template onto the back of the glued pieces. Best to wait until the glue has tried to do this step.
- Cut out the traced shape using a scroll saw. If, like me, you don’t have a scroll saw, you can use a jigsaw. If your jigsaw is of the cheap handheld type like mine is, it can cause problems. The vibrations dislodged quite a few of my glued pieces and they had to be re-glued into position.
- Attach the template to the back of the glued pieces. This is actually optional, although gluing, nailing, or screwing this in place will add extra support to this glued-only piece (helpful in the event of a drop).
- Finish the piece as desired. I kept mine very raw. You can sand, add washes, stain, polyurethane, or even BeDazzle. Don’t forgot to add a sawtooth hanger on the back.
One final note. You may not have access to a scroll saw or a jigsaw. You can still complete this project by clamping your scrap pieces together without gluing them. Trace your shape onto the back, cut the pieces individually with a hand saw or circular saw (use extra caution if using a circular saw), then glue them together. Admittedly this will take some time, and clamping the pieces may be difficult. But if you’re the meticulous type, this is absolutely doable.