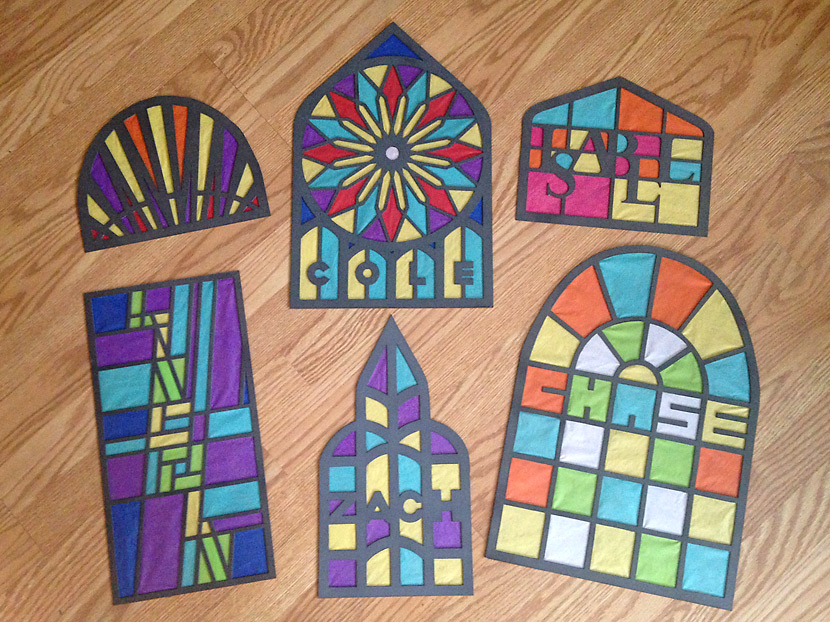
This is my tenth anniversary of using creative themes for wrapping family gifts. It started out as something I did for everyone in the family—but as the family grew, I limited these creations to just my nephews and nieces.
As this was a special year, I decided to do something a bit more involved. It’s a concept I’ve wanted to do for the past few years but didn’t have the time. This year God has blessed us with a second child who will be arriving very soon, so we finished up our Christmas tasks quite early just in case he arrives early. That left me with time to devote to this.
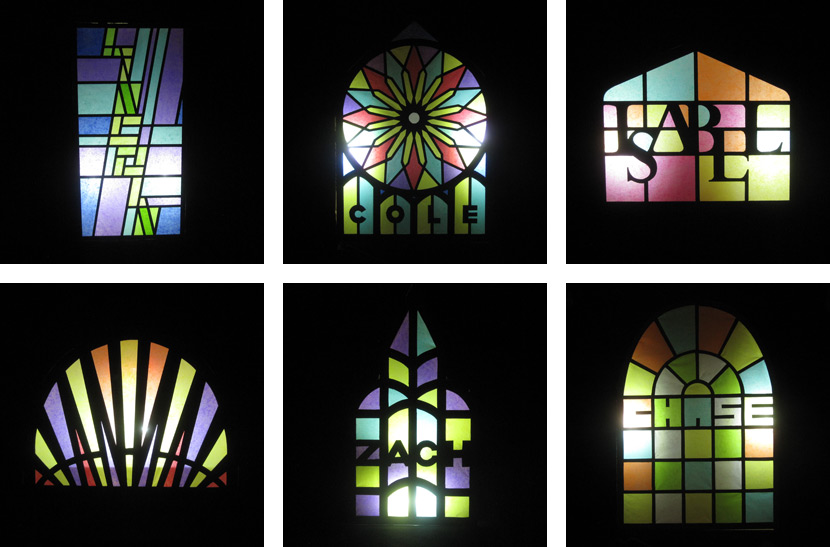
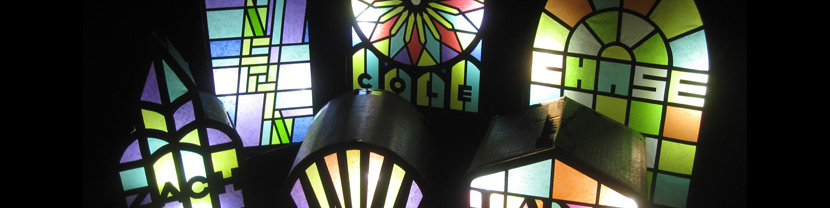
The theme was stained glass windows—but as these are gifts for youngsters there’s no actual glass involved. The challenges were many:
- Simulate stained glass.
- Choose a material that allows light to easily pass through.
- Don’t allow the contents of the gift to be seen through the material.
- Attach the colored pieces to the design frame.
- Light the gifts very brightly from within.
- Be sure the contents of the package don’t cast a shadow onto the design.
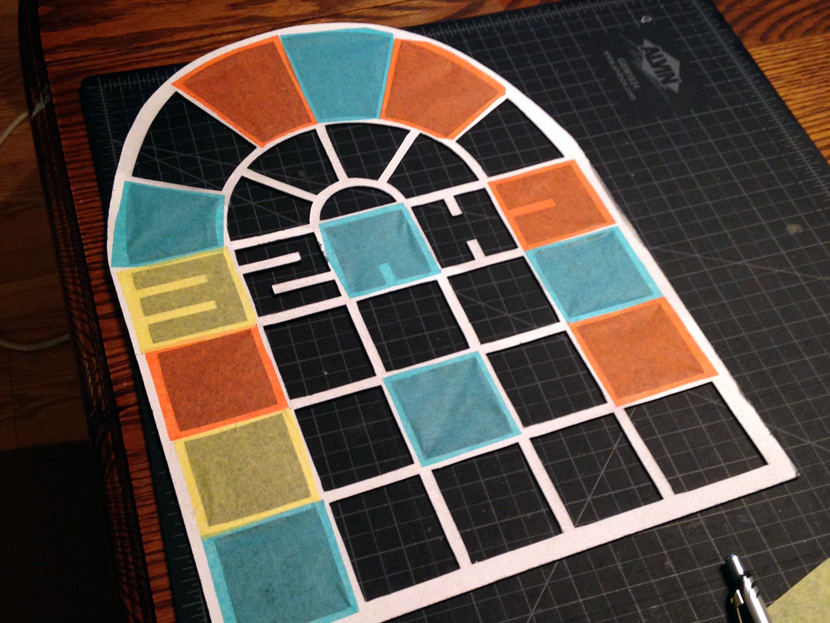
The frame
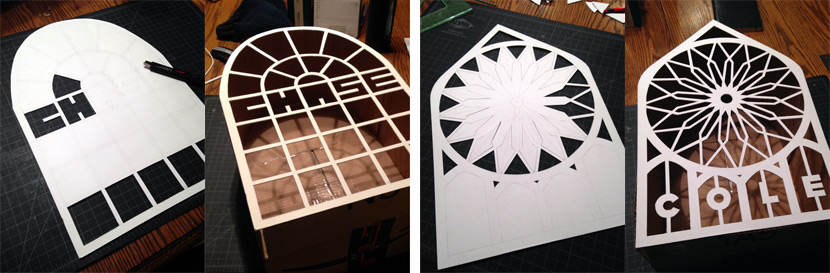
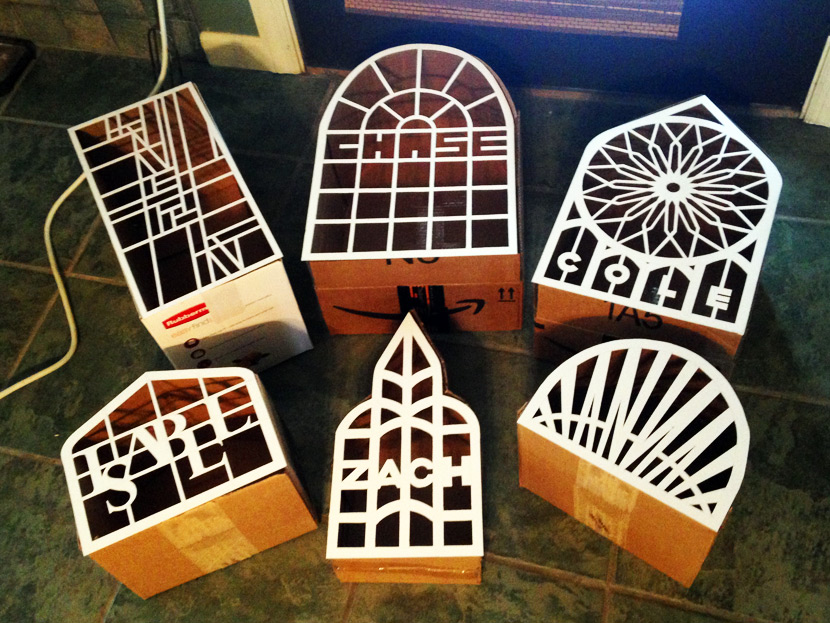
For the design frame you need to use something sturdy. The corrugation of cardboard makes it undesirable. I went with mat board and that worked great. Mat board is designed to be cut and so it stands up well as a result. Now you do need to be careful with mat board. I didn’t research how it’s made but there is some compressed layering going on. I’ve had trouble with edges starting to peel up in the past when I’ve used mat board in ways it wasn’t intended. That being said, I had no trouble with that in this project. I spray painted the display side of my mat board black, but you can also purchase black mat board and that would look very sharp.
I created my stained glass designs with Adobe Illustrator then drew them onto the mat board. As you design, remember you’re going to be attaching pieces of colored material behind each hole you create. So the thinner your borders, the more precise you will need to be when cutting your colored shapes.
Colored materials
In picking a “glass” material, I always imagined using some kind of cellophone. It’s bright, it’s shiny like glass, plus light can easily pass through. It would be gorgeous. However you can see through cellophane very easily. Maybe enough layering would obscure the gift contents—I didn’t do a lot of testing with it. Instead I gave up on cellophane because it’s so slick and I was afraid it would be hard to glue or otherwise attach to the design frame.
I was worried the best answer was tissue paper—and it was. My fear was that it would be extremely fragile, difficult to work with, and too opaque. But those fears quickly dispersed and I became a huge fan. Tissue paper worked wonderfully. It’s actually quite strong, and it allows plenty of light to pass through without allowing you to see through the paper.
Attaching the colors
This part worried me the most. I wasn’t sure how to attach the pieces to the back of the mat board in a way that wouldn’t be messy and wouldn’t take a long time. I started out with glue sticks and they were a dream come true. Use small sticks and always push the stick toward the open hole, especially at corners, or the sharply-cut edges of the board will scrape the glue off of the stick and leave you with glue residue you need to take off. And tissue paper sticks to the glue with no problem. I did not have one single incident of a piece of tissue paper coming off or even pulling up. It’s so light, yet textured, that it adheres with no problem. Even my pieces that had thinner borders were a breeze to work with thanks to glue sticks.
When it comes to cutting out the color pieces, simply place the tissue paper atop the desired hole and trace the shape onto the paper. You can then cut your shape to a perfect size, largely eliminating the problem of thin borders.
Lighting
LED lighting has become very inexpensive. I searched a few stores until I found LED lights approximately 3″ x 2″ x 1/2″ at a price of only one dollar each! I purchased two per gift. I now had plenty of light—but how do you keep the actual gift inside the box from casting a shadow onto the design?
Fortunately I had thought that problem through from the start. Each box I used was quite deep. Most of them had to be made deeper than they actually were. That allowed me to attach the gift to the back and bottom of the box and prevent it from casting shadows. It was then a bit of a puzzle to figure out the positioning of each LED light so that it illuminated as much of the face of the design as possible, while avoiding having the lights shine directly at the design. And shadows were still a concern. Some gifts were larger than others so that the lights could not be all the way at the back of the box. Much packing tape was used to secure both the gifts and the lights into perfect position.
Which reminds me—when it comes to cardboard, use packing tape! Don’t even mess with Scotch tape or you will end up a frustrated gift wrapper.

Conclusion
I waited to seal the gifts until the morning of our Christmas celebration. I turned on the LED lights and taped the design frame onto the front of each box. (I made the mistake of using Scotch tape and had to redo it with packing tape.) And despite the brightness of the LED lights, the gifts naturally look much better when viewed in a dimly-lit room. I placed them in a side room of the basement where we had our celebration and had my nephews and nieces go into that darker room to find their gifts. And while I normally create the gifts in a way that the packaging gets destroyed, this year I used minimal tape when attaching the design to the face of each box so that the children could keep their names—which they all did.
Check out my gift wrapping from previous years!


My middle name is Chase. I have an identical twin brother, his middle name is Cole. I stumbled across your website 10 minutes ago, this is weird.
Heh, nice!